Moyea PPT to DVD Burner,requiring no programming knowledge or skills, is a fine
presentation program to create
DVD presentations from
PPT slideshows. With the
converted PPT presentations for DVD player, you can reach wider audience and more potential markets with you image and products.
Before start burning ppt,download
Moyea PPT to DVD Burner (
PPT2DVD_Setup.exe) from
Moyea Software.
Then you should install the software and open it.
Let's start to enjoy
burning DVD from PowerPoint now!
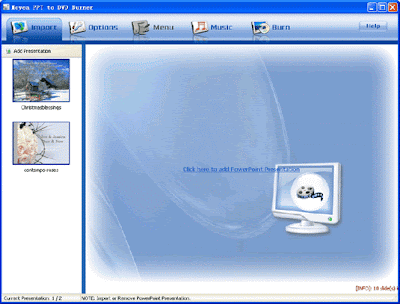
1.Import PPT FilesClick"
Add Presentation "or"
Click here to add PowerPoint Presentation "to add PPT file you want to convert. This may take a few seconds depending on the size of the PPT file. You can add at most 9 PPT files at a time.
At the bottom of the screen,
[INFO] displays detailed information of the selected PPT file, including: 1. total number of slides; 2. slides with a transition time of over 3 minutes; 3. Media object and some other OLE object like Windows Media Player, QuickTime Control, Shockwave Flash that is not availabe in target PPT file.
 2.Set Options2.1.Set Output Options
Click the “Create Standard DVD” , “Convert to Video File(s)” or "Create High-Definition DVD" button to choose your conversion type.
Note: under the “Convert to Video File(s)”, the “menu” button is
not available.
Create Standard DVD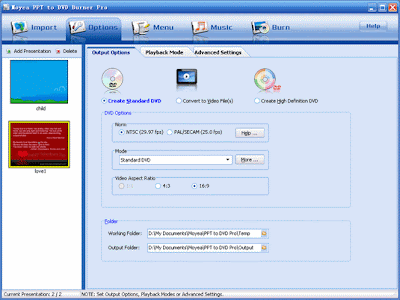 Norm
Norm: NTSC and PAL/SECAM are two TV standards, select one that accords with your country’s standard. If you are not sure which TV standard your country uses, click the button "Help" to select your country or location.
Mode: Under “Create Standard DVD” button, the default mode is standard DVD. Click “More” to set the Aspect, Encoder Size and Display Size.
Video Aspect Ratio: Choose an aspect ration for the created DVD movie.
Convert to Video File(s)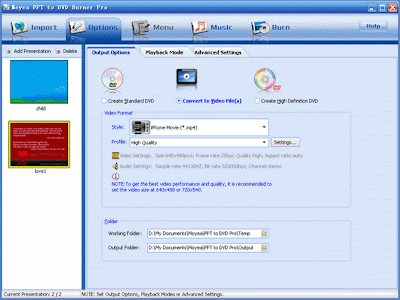 Video Format:
 A format is a series of pre-set settings that you can choose.
Style: Click the drop-down button to select an output video style. These styles are very useful as they are commonly used. It can be very useful when you want to convert your PPT files to the other video settings and audio settings for the output files. To date, these Export Styles of video file are available: AVI, MP4, MOV, WMV, 3GP, 3G2, MPG, VOB, FLV, DV.
Profile: After choosing an output video style, you can choose a profile from the list that are commonly used. Also you can click “Settings” for detailed settings of parameters for each item, such as video and audio codec, bit rate, frame rate, etc.
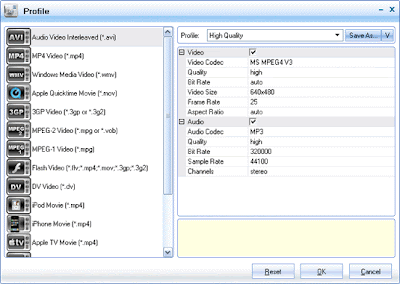 Video SettingsVideo Codec:
 Select a video codec for the output file, if other options are available.
Bit Rate: Select a proper bit rate for your video when other options are available. Video bit rate (kbit/s).
Video size: Select a preset frame size or custom frame size for the output video. You can select "original" to keep the original frame size of the SWF file, or choose from the given options. Frame size (WxH).
Frame Rate: Select a lower frame rate for your video if you want to make the file size smaller, or you can select "original" to keep the frame rate of the original SWF file. Frame rate (hz).
Aspect Ratio: This option is to show different aspect ratios for you to choose from, or to keep the original/auto one for the created video file.
Audio SettingsAudio Codec: Select an audio codec for the output file, if other options are available.
Bit Rate: Select a proper bit rate for your audio data, if other options are available. Audio bit rate (bit/s).
Sample Rate: Select a proper sample rate for your audio data, if other options are available. Audio sampling rate (hz).
Channels: Select an audio channel for your audio data. Two types are available generally, mono and standard stereo.
Create High-Definition DVDNorm: NTSC and PAL/SECAM are two TV standards, select one that accords with your country’s standard. If you are not sure which TV standard your country uses, click the button "Help" to select your country or location.
Mode: Under “Create High-Definition DVD” button, two types of formats are available, 720p(1280*720) and 1080p(1920*1080). Click “More” to set Encoder Size and Display Size.
Folder: working folder and output folder locations. Make sure that the two location directories are NOT specified the same, for all the files located in working folder will be removed automatically when the process completes.
2.2.Set Playback Mode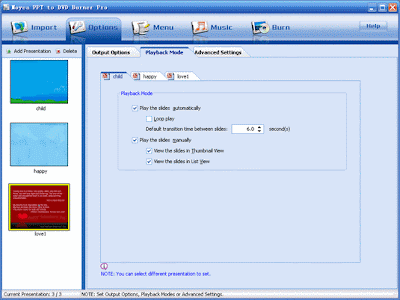
You can select different PPT files to set.
Under Playback Mode, you can select to play the slides automatically or manually, or both.
Under automatic mode, you can select
Loop play to allow your slides continuing playback until you force it to stop. You can set the transition time (0.0~100.0s) between slides, while the defult one is 6 seconds.
Under manual mode, you can select to show the slides in thumbnail view or list view, or both.
2.3.Advanced SettingsThe Advanced Settings include some more detailed settings.
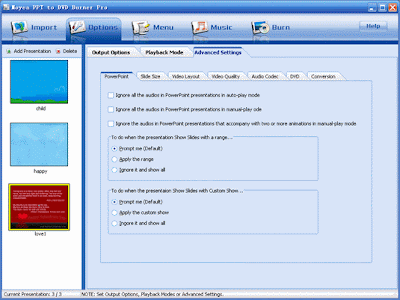 PowerPoint:
 You can select to ignore all the audios in PowerPoint file as you like. In order to get better result, we suggest that you choose to ignore the audios in PowerPoint file that accompany with two or more animations when you would like your PowerPoint files played under manual mode.
To do when slide show with a rang...: If you have set up slide show range (check item:Slide Show->Set Up Show->Show Slides->From-to-) in original Powerpoint file, then when to convert ppt file, "
Prompt me" means that a dialog box will pop up to let you decide if apply the range or not, "
Apply the range"means that you apply the range as default, "
Ignore the range and show all" means that the program will ignore your original range and process all the slides as default.
To do when the presentation show slides with Custom show….: If you have set up custom show (check item: Slide Show-->Custom shows) in original Powerpoint file, then when to convert ppt file, "
Prompt me" means that a dialog box will pop up to let you decide if apply the custom show or not, "
Apply the custom show" means that you apply the custom show as default, "
Ignore it and show all" means that the program will ignore your original custom show and process all the slides as default.
Slide Size: Select slide size later you play on TV. Keep the scale of the slides and adjust the window when playing or adjust the slide size to the requested.
Video Layout: Select different video layout. If your PowerPoint file is full of different elements, "Safe size" will be a good choice.
Video Quality: Higher video quality or smaller output files size? It's up to you. You have there choices and it's recommended that you choose "High Quality" to get the best result.
Audio Codec: Two audio codecs are listed here. Choose one that your DVD player supports. If you are not sure which audio codec your DVD player supports, just choose "AC3" as recommended, for "AC3" is the standard DVD audio codec.
DVD: Set DVD audio language code,Customize your DVD menu with different focused styles you like: Marked (Default) or Framed.
Conversion: Check to mute the audio file while converting PowerPoint to DVD. If the same name of output file exists, you can either choose to rename or override it.
3.Set DVD MenuThe option "Menu" is available only when you have selected "Create Standard DVD "or”
Created High Definition DVD” As the operations are all the same, so I will take Standard
DVD Menu Settings as the example in this operation..
If only one PPT file is imported, only a Title Menu will show up.
If two or more PPT files are imported, two menus: Main Menu and Title Menu will show up.
Main Menu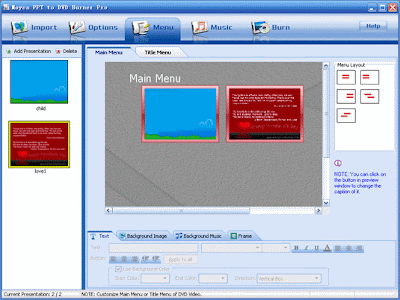
Click "Main Menu" in the frame, drag it wherever you want, and edit its size as you like in order to get your desired effect.
Text: Input any character to change the caption, you can also change the attribution of the text.
Background Image: there are three ways to change the background: use template and select one on the right, select image from your computer, or change the background color.
Background Music: Enable you to add supported media file as the background music.
Frame: you can select the frame to get a better view.
Title Menu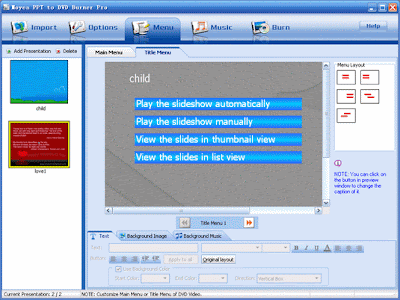
All the settings are the same as in the "
Main Menu".
4.Audio Settings Auto ModeThis lets you configure audio under auto playback mode.
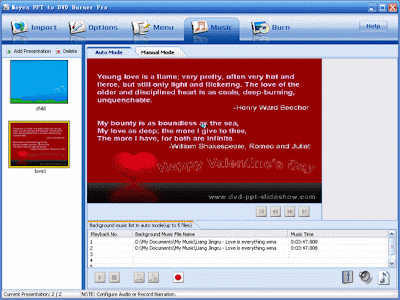
Click the
"Add" button to add audio file,or Click the "
Record Narration" button to record narration. Once the narration was completed, save it.
Select the audio and click the "
Start" button to test the effect.
If you do not satisfy with the audio you added, select the audio and remove it by clicking the "
Delete" button.
Note: Only allow to add one audio file.
Manual ModeThis lets you configure audio under manual playback mode is only applied to “Create DVD” or “Create HD-DVD” file.
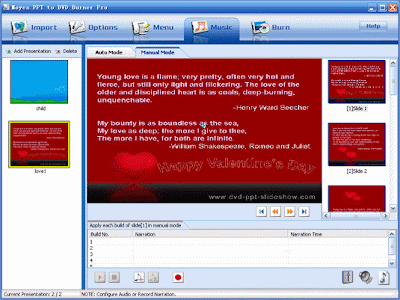
Under manual mode, you can add audio file to every single slide of a PPT file separately. One or more audio files or narrations are allowed to be added, according to the animations(
Build No) contained in the slide.
5.Start Burn
Considering the differences between DVD settings and Video Format settings, I will show you the operations in 2 branches:
PPT to DVD Burning and
PPT to Video Conversion PPT to DVD BurningMoyea PPT to DVD Burner Pro can convert PowerPoint to High Definition DVD as well as Standard DVD, and the operations are all the same, so I will take the later as the example in this operation.
Check “Create Standard DVD”, then click “Burn” to enter this interface.

Burn to Disc: Be sure that you have a DVD burner available on your computer and insert a writeable DVD Disc.
Volume Label: Rename the volume label whatever you like.
Create DVD image file: If check “Create DVD image file”, next time you can directly burn the image file to DVD by using a third-part burn program.
ISO File: You can change the directory for saving ISO File.
PPT to Video ConversionIf "Convert to Video Files" button was checked, click “Burn” to enter this interface
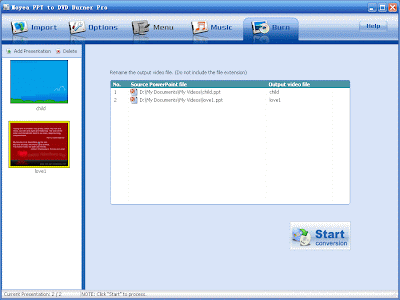
Double click the choosed file to rename output video file
Superior high speed conversion
After all the settings completed, click the "
Start Burn" button to start the conversion.
All the steps are over.Now let's review the main steps:
1. Click "Add Presentation " button or "Click here to add PowerPoint Presentation " button to import PPT files.
2. Click Options to set Output Options, Playback Mode and some Advanced Settings.
3.Click Menu to customize menu.
4. Click Music to set audios under Auto Mode and Manual Mode separately.
5. Click the Burn button to start Burn.
Source:http://www.dvd-ppt-slideshow.com/ppt_to_dvd/tutorial.html


